- What Is Reverse Prayer Pose Exercise?
- What Muscle Groups Are Targeted?
- Advantages and Disadvantages of Reverse Prayer Pose Exercise
- Equipment Needed for Reverse Prayer Pose Exercise
- How Often to Do Reverse Prayer Pose Exercise
- Who Needs This Exercise and Who Should Avoid It
- Alternatives to Reverse Prayer Pose Exercise
- Commmon Mistakes in Reverse Prayer Pose Exercise
What Is Reverse Prayer Pose Exercise?
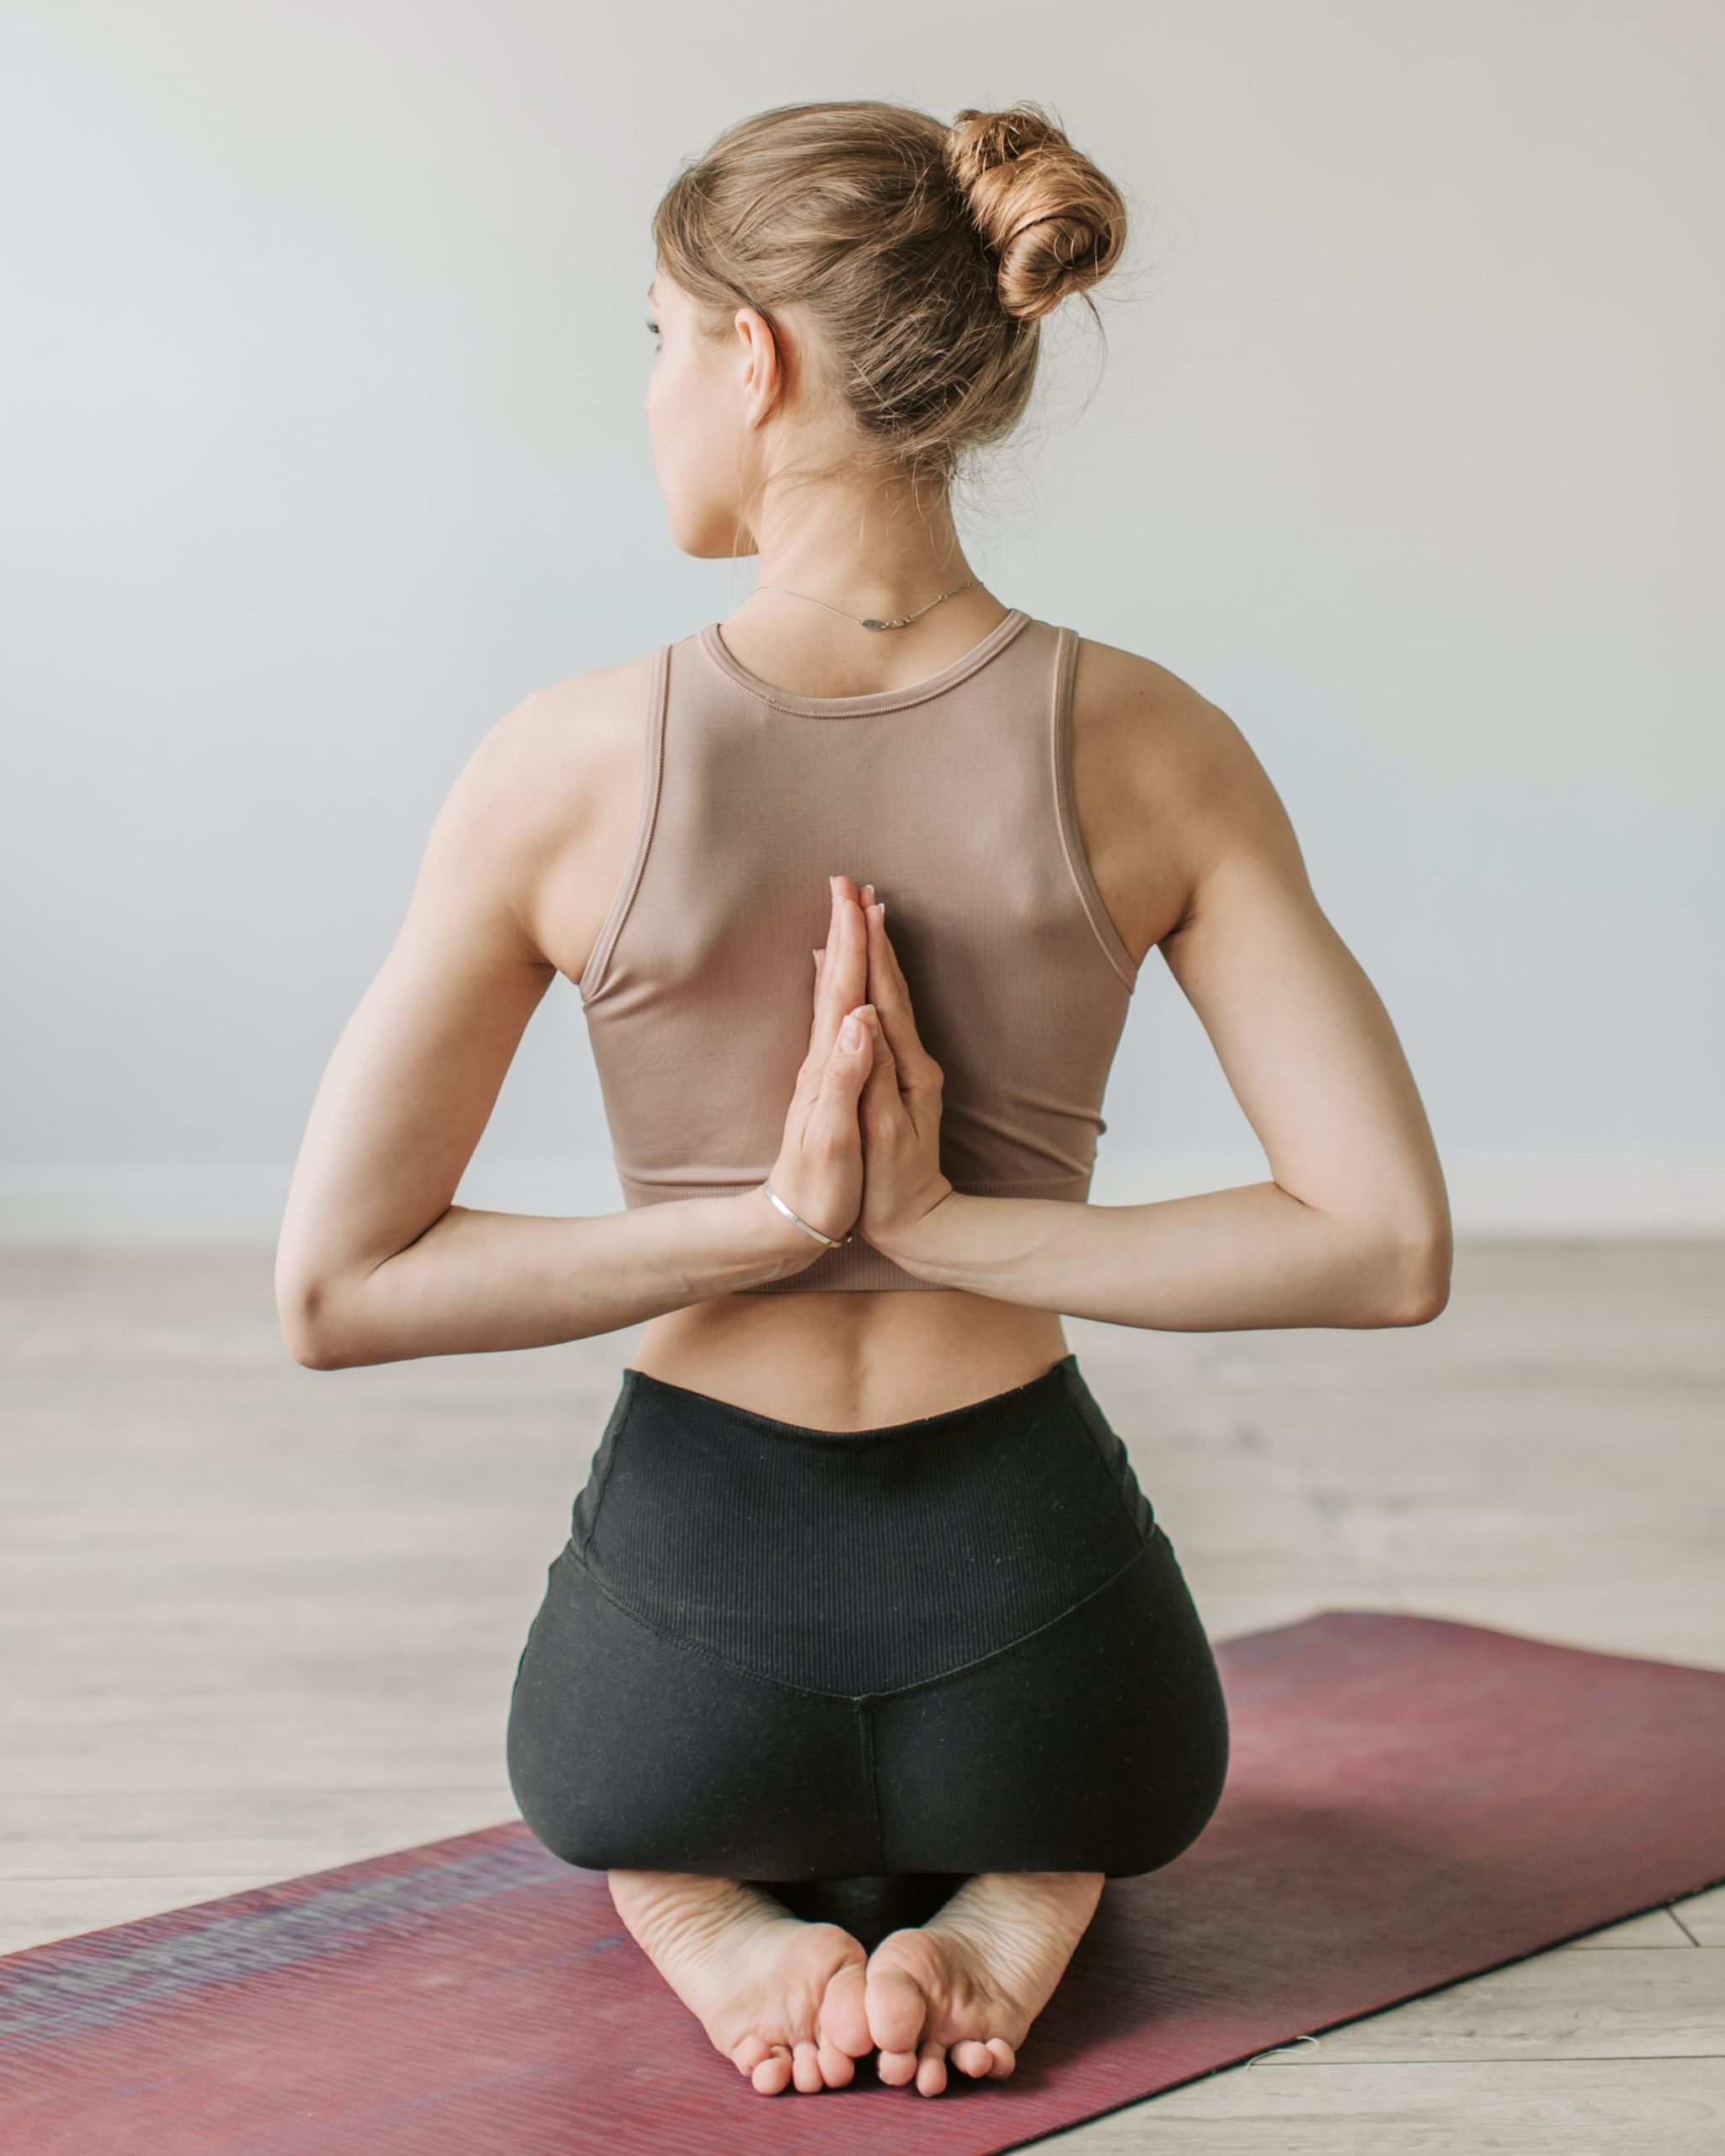
The Reverse Prayer Pose, also known as Paschim Namaskarasana or Viparita Namaskarasana, is a yoga pose that involves bringing the hands behind the back and joining them in a prayer position with the fingers pointing downward. To achieve this pose, one typically clasps their hands together behind the back, drawing the palms close and pressing them against each other. The wrists are positioned between the shoulder blades, and the fingers point downward, creating a stretch across the wrists, forearms, and shoulders.
This pose is known for its benefits in improving shoulder flexibility, releasing tension in the upper back, and promoting better posture. The Reverse Prayer Pose is often integrated into yoga sequences or used as a preparatory stretch for more advanced yoga poses. It also encourages chest expansion and opens the heart center.
While the Reverse Prayer Pose offers physical benefits, individuals with wrist or shoulder issues should approach it with caution, and modifications or props may be used to accommodate varying levels of flexibility. As with any yoga pose, it’s essential to practice with mindfulness and listen to the body to avoid strain or discomfort.
What Muscle Groups Are Targeted?
The Reverse Prayer Pose primarily targets several muscle groups in the upper body, including:
- Shoulders (Deltoids):
- The pose deeply stretches and engages the deltoid muscles, which are responsible for the movement and stability of the shoulder joint.
- Chest (Pectoralis Major):
- The opening of the chest in the Reverse Prayer Pose helps stretch the pectoralis major muscles, promoting chest expansion and improved posture.
- Forearms and Wrists:
- Clasping the hands behind the back with the fingers pointing downward places a stretch on the forearms and wrists, enhancing flexibility in these areas.
- Triceps:
- The extension of the arms behind the back activates and stretches the triceps, the muscles at the back of the upper arm.
- Upper Back (Rhomboids and Trapezius):
- The pose encourages a stretch across the upper back, targeting the rhomboid and trapezius muscles, which play a crucial role in maintaining upper back posture.
- Biceps:
- While not as intensely engaged as the triceps, the biceps also play a role in the positioning of the arms behind the back in the Reverse Prayer Pose.
The combination of these muscle activations and stretches contributes to increased flexibility, improved range of motion in the shoulders, and enhanced upper body posture. Practicing this pose regularly may also help alleviate tension and stiffness in the upper back and shoulders. Individuals should approach the Reverse Prayer Pose mindfully, especially if they have wrist or shoulder issues, and consider modifications or props under the guidance of a yoga instructor.
Advantages and Disadvantages of Reverse Prayer Pose Exercise
Advantages of Reverse Prayer Pose:
- Shoulder Flexibility:
- The pose is effective in improving shoulder flexibility and mobility, as it requires the arms to reach behind the back and the hands to clasp in a prayer position.
- Chest Opening:
- The Reverse Prayer Pose encourages chest expansion, stretching the pectoral muscles. This can be beneficial for individuals who spend long periods sitting or hunched over, helping to counteract poor posture.
- Upper Back Stretch:
- The pose targets the upper back muscles, including the rhomboids and trapezius, promoting a stretch in this area. This can be particularly useful for individuals with tension or stiffness in the upper back.
- Wrist and Forearm Stretch:
- Clasping the hands behind the back in this position provides a stretch to the wrists and forearms, contributing to improved flexibility in these areas.
- Mind-Body Connection:
- Like many yoga poses, the Reverse Prayer Pose encourages mindfulness and focus on the breath. This mind-body connection can contribute to relaxation and stress reduction.
Disadvantages of Reverse Prayer Pose:
- Wrist Discomfort:
- Some individuals may experience discomfort in the wrists, especially if they have pre-existing wrist issues or limited flexibility in this area.
- Shoulder Strain:
- Individuals with shoulder injuries or restrictions may find the pose challenging or uncomfortable. It’s essential to approach this pose with caution and possibly seek modifications or alternatives.
- Limited Accessibility:
- The Reverse Prayer Pose may be challenging for beginners or individuals with tight shoulders. Modifications or the use of props may be necessary to make the pose more accessible.
- Neck Discomfort:
- If proper alignment is not maintained, there may be strain on the neck. It’s crucial to keep the neck in a neutral position and avoid excessive arching.
- Not Suitable for Everyone:
- Pregnant individuals or those with certain health conditions may find the pose unsuitable. It’s advisable to consult with a healthcare professional or yoga instructor before attempting the Reverse Prayer Pose.
As with any yoga or stretching exercise, individuals should practice the Reverse Prayer Pose mindfully, listen to their bodies, and consider their own flexibility and physical condition. Consulting with a qualified yoga instructor or healthcare professional can provide personalized guidance and modifications based on individual needs and limitations.
Equipment Needed for Reverse Prayer Pose Exercise
The Reverse Prayer Pose is a yoga pose that typically doesn’t require any specific equipment. However, using props can help make the pose more accessible, especially for beginners or individuals with limited flexibility. Here are some optional props and considerations:
- Yoga Mat:
- A yoga mat provides a comfortable and non-slip surface, making it easier to maintain stability during the pose.
- Yoga Blocks:
- Placing yoga blocks under the hands can assist individuals who have difficulty reaching their hands behind their back. Blocks can reduce the distance between the hands, making the pose more accessible.
- Strap or Belt:
- For individuals with limited shoulder flexibility, a yoga strap or belt can be used to bridge the gap between the hands. Loop the strap around the hands and hold onto the ends, gradually working toward bringing the hands closer together.
- Blanket or Cushion:
- Placing a folded blanket or cushion under the knees can provide additional comfort, especially for individuals who experience discomfort in the knee area.
While these props can be helpful, it’s important to note that the Reverse Prayer Pose can still be practiced without them. As with any yoga pose, proper technique, alignment, and mindful practice are essential. If you are new to the pose or have specific health concerns, consider practicing under the guidance of a qualified yoga instructor who can provide personalized instructions and modifications.
How Often to Do Reverse Prayer Pose Exercise
The frequency of practicing the Reverse Prayer Pose can vary based on individual factors, flexibility levels, and overall fitness goals. Here are some general guidelines:
- Regular Practice:
- For those looking to improve shoulder flexibility and experience the full benefits of the pose, incorporating the Reverse Prayer Pose into a regular yoga practice is recommended. This could mean practicing it a few times a week.
- Warm-Up and Cool-Down:
- The Reverse Prayer Pose can be included as part of your warm-up routine to prepare the shoulders and upper back for more intense stretches or exercises. Additionally, it can be incorporated into your cool-down routine to promote flexibility and release tension after a workout.
- Mindful Practice:
- Listen to your body and avoid pushing yourself into discomfort or pain. If you’re a beginner or if the pose feels challenging, start with a few breaths in the pose and gradually increase the duration over time.
- Consistency is Key:
- Consistency is crucial for progress in flexibility. Regular, gentle practice of the Reverse Prayer Pose can lead to improved shoulder mobility and increased comfort in the pose.
- Consider Modifications:
- If you find the pose difficult, consider using props like yoga blocks or a strap to make it more accessible. Consistent practice with modifications can still offer benefits.
- Individual Variation:
- The optimal frequency varies from person to person. Some may benefit from practicing the Reverse Prayer Pose more frequently, while others may find benefit in practicing it less often. Pay attention to how your body responds.
As with any exercise, it’s important to approach the Reverse Prayer Pose mindfully, especially if you have pre-existing conditions or injuries. If you have concerns or specific health considerations, consult with a qualified yoga instructor or healthcare professional for personalized guidance on how often to practice the Reverse Prayer Pose and any modifications that may be necessary.
Who Needs This Exercise and Who Should Avoid It
Who May Benefit from the Reverse Prayer Pose:
- Yoga Enthusiasts:
- Individuals who regularly practice yoga and are looking to enhance shoulder flexibility, improve posture, and deepen their practice may find the Reverse Prayer Pose beneficial.
- Office Workers:
- People who spend extended periods sitting at a desk or in front of a computer may benefit from the pose’s chest-opening effects, helping counteract the effects of prolonged sitting and promoting better posture.
- Athletes:
- Athletes, especially those involved in activities requiring upper body mobility, may incorporate the Reverse Prayer Pose to improve shoulder flexibility and prevent muscle imbalances.
- Those with Upper Back Tension:
- Individuals experiencing tension or stiffness in the upper back and shoulders may find relief through the stretching and opening effects of this pose.
- Yoga Practitioners Seeking Challenge:
- For those who enjoy a challenge in their yoga practice, the Reverse Prayer Pose offers a unique and more advanced variation that engages multiple muscle groups.
Who Should Approach with Caution or Avoid the Reverse Prayer Pose:
- Shoulder Injuries or Restrictions:
- Individuals with shoulder injuries or restrictions, such as rotator cuff issues or impingements, should approach the Reverse Prayer Pose with caution. Modifications or avoidance may be necessary.
- Wrist Issues:
- Those with wrist issues or discomfort should be mindful when practicing the pose. Modifications, such as using props or adjusting hand placement, can help alleviate strain on the wrists.
- Pregnant Individuals:
- Pregnant individuals, especially in later stages of pregnancy, may find the pose uncomfortable or challenging due to changes in the center of gravity. It’s advisable to avoid or modify the pose, and consultation with a healthcare professional is recommended.
- Recent Injuries:
- Individuals with recent injuries to the back, shoulders, or wrists should avoid the pose until they have sufficiently recovered. Consultation with a healthcare professional is advised.
- Beginners with Limited Flexibility:
- Beginners or those with limited flexibility in the shoulders may find the Reverse Prayer Pose challenging. It’s important to start gradually and consider modifications or alternative poses.
Before attempting the Reverse Prayer Pose, especially if you have any health concerns or conditions, it’s advisable to consult with a healthcare professional or a qualified yoga instructor. They can provide guidance on whether the pose is suitable for your individual circumstances and suggest modifications if needed.
Alternatives to Reverse Prayer Pose Exercise
If the Reverse Prayer Pose is challenging or uncomfortable for you, or if you have specific limitations or conditions, there are alternative exercises that offer similar benefits for shoulder flexibility, chest opening, and upper back stretching. Here are some alternatives:
- Eagle Arms:
- Sit or stand comfortably.
- Cross one arm over the other at the elbow.
- Bend both elbows and bring the palms of your hands together, or try to touch the back of the hands together.
- Lift your elbows slightly to feel a stretch across the upper back and shoulders.
- Cow Face Arms:
- Extend one arm overhead and bend the elbow, reaching the hand down your back.
- Reach the opposite arm behind your back and try to clasp hands.
- If your hands don’t meet, hold onto a strap or towel.
- Feel the stretch across the triceps and shoulders.
- Thread the Needle Pose:
- Start on hands and knees in a tabletop position.
- Slide one arm under the other, bringing the shoulder and temple to the ground.
- Stretch the opposite arm overhead.
- Feel a stretch in the upper back and shoulders.
- Sphinx Pose:
- Lie on your stomach with your elbows directly under your shoulders.
- Press your forearms into the ground and lift your chest, keeping your hips on the mat.
- Feel a gentle stretch in the chest and upper back.
- Seated Forward Bend (Paschimottanasana):
- Sit with your legs extended straight in front of you.
- Hinge at your hips and reach forward toward your feet.
- Hold onto your shins, ankles, or feet, depending on your flexibility.
- Feel a stretch along the entire spine and backs of the legs.
- Chest Opener Against the Wall:
- Stand facing a wall.
- Place your palms on the wall at shoulder height.
- Step back and lean into the wall, feeling a stretch across the chest and shoulders.
- Puppy Pose:
- Start in a tabletop position.
- Walk your hands forward while keeping your hips above your knees.
- Lower your chest toward the ground, extending your arms forward.
- Feel a stretch in the shoulders and upper back.
Remember to perform these alternatives within a comfortable range of motion, and modify them as needed to suit your individual needs. As with any exercise, it’s crucial to listen to your body and consult with a healthcare professional or fitness instructor if you have specific health concerns or conditions.
Commmon Mistakes in Reverse Prayer Pose Exercise
The Reverse Prayer Pose requires proper technique and mindful execution to avoid strain and promote flexibility. Here are some common mistakes to be aware of:
- Forcing the Hands Together:
- Mistake: Forcing the hands together behind the back, especially for individuals with limited shoulder flexibility.
- Correction: Start with the hands apart and gradually work towards bringing them closer over time. Use props or modifications to make the pose more accessible.
- Arching the Lower Back:
- Mistake: Allowing the lower back to arch excessively, which can strain the lumbar spine.
- Correction: Engage the core muscles and maintain a neutral spine. Hinge at the hips and avoid overarching in the lower back.
- Straining the Neck:
- Mistake: Allowing the neck to jut forward or excessively arch backward.
- Correction: Keep the neck in a neutral position, aligned with the spine. Avoid unnecessary strain on the neck muscles.
- Tensing the Shoulders:
- Mistake: Holding tension in the shoulders rather than allowing them to relax into the stretch.
- Correction: Focus on deep, relaxed breathing. Allow the shoulders to soften and sink into the stretch without unnecessary tension.
- Neglecting Breathing:
- Mistake: Holding the breath during the pose.
- Correction: Breathe deeply and steadily. Inhale before starting the stretch, and exhale as you ease into the Reverse Prayer Pose. Continue to breathe throughout the pose.
- Incorrect Hand Placement:
- Mistake: Placing the hands too high or too low on the back, leading to discomfort.
- Correction: Aim to place the hands between the shoulder blades, adjusting as needed based on individual flexibility.
- Overlooking Wrist Discomfort:
- Mistake: Ignoring discomfort in the wrists, especially for individuals with wrist issues.
- Correction: Modify hand placement or use props like yoga blocks to alleviate wrist discomfort. If needed, consider alternative poses.
- Rounding the Shoulders:
- Mistake: Allowing the shoulders to round forward instead of opening the chest.
- Correction: Focus on drawing the shoulder blades together and down the back to open the chest. Lift the chest while maintaining a neutral spine.
- Lack of Gradual Progression:
- Mistake: Attempting to achieve the full Reverse Prayer Pose without gradual progression.
- Correction: Start with easier shoulder stretches and gradually progress toward the Reverse Prayer Pose over time. Consistency is key.
- Ignoring Individual Limitations:
- Mistake: Ignoring personal limitations or injuries.
- Correction: Be mindful of your body’s limitations and consult with a healthcare professional or a qualified yoga instructor if you have specific concerns.
By being aware of these common mistakes and practicing the Reverse Prayer Pose with attention to proper form, individuals can maximize the benefits of the pose while minimizing the risk of discomfort or injury.